9 th February 2007
© W.Richmond www.Design-Technology.info
Equipment Guide
IF IN DOUBT ASK !!!!
KS3 – Projects ( years 7 to 9 )

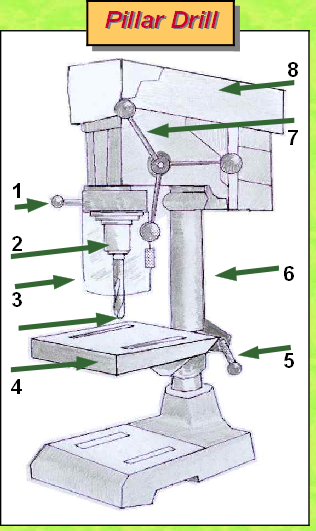
The pillar drill has a smaller version with a shorter pillar – this is often called the Bench Drill but as both depend on the worktable moving up and down the supporting pillar, they can really both be referred to as
pillar drills.
There are a number of common sense safety
rules for using machinery and observing these rules are very
much in your own interests. If the design of a piece of machinery includes a drill guard (3) it has been added
for a reason and a moments thought will let you see that it will protect the user from shards of the material being drilled. Further examination of the worktable (4) will show that it has two (sometimes more) slots and holes.
These would be very convenient for attaching some sort of additional equipment – such as a holding device for the work being drilled…. Guess what … – that’s what they are for ! Machine vices are very heavy and have similar slots on their sides and holding bolts can be attached to keep the machine vice in one place to allow for safe and repeatedly accurate drilling. The slots allow for a little minor adjustment to be made once the vice is in place.
As pillar drills are machines for drilling holes the drill bit (2) is very important. Drill bits can have different shaped tips designed for different materials but they will all get hot as the friction that is part of their cutting through the material heats them. Be careful therefore when touching the bit after drilling and make sure hands and fingers are well away from the rotating tip. A significant rule that makes a lot of sense is that only one person operates the drill. If two people are doing a part of the task necessary – like one moving the drill into place using the lever for lowering the drill (7) - how can we ever be sure that we know what the other person has in mind !
Hidden away in the casing at the top of the drill are pulleys that allow the speed of rotation of the drill bit to be adjusted (8). Different materials need different cutting speeds and this allows that change to be made – although school students must not usually make this adjustment.
As pillar drills are machines for drilling holes the drill bit (2) is very important. Drill bits can have different shaped tips designed for different materials but they will all get hot as the friction that is part of their cutting through the material heats them. Be careful therefore when touching the bit after drilling and make sure hands and fingers are well away from the rotating tip. A significant rule that makes a lot of sense is that only one person operates the drill. If two people are doing a part of the task necessary – like one moving the drill into place using the lever for lowering the drill (7) -
Hidden away in the casing at the top of the drill are pulleys that allow the speed of rotation of the drill bit to be adjusted (8). Different materials need different cutting speeds and this allows that change to be made – although school students must not usually make this adjustment.
1. Locking lever
preventing lowering of the drill assembly .
2. Chuck – holding
device for the drill bit
3. Safety guard.
4. Work table.
5. Work table lock –
holding the table in
position when the
height has been
selected.
6. Pillar. (The Column)
7. Lowering handles –
rotate to lower the
chuck assembly (with
drill bit)
8. Pulley gearing